


Oliver Bernuetz
 This is my attempt at creating a set of rules for playing a tabletop game of Shield Push. Its based at least partially on the description of the game as presented in The Garhound Contests for Hero Wars. www.glorantha.com/hw/fan/garhound.html. The intent of these rules is to allow existing player characters in your campaign to be Shield Push players. I wanted to simulate the play of the game without going into a lot of detail or requiring excessive die rolling. The game includes both die rolls and card play. Note that this game uses the MRQ II rules. If you're playing a different ruleset, you'll need to translate Resonance (a measure of Mythic "difficulty") and Pact with Yelm/Solar Pantheon into your own system.
The Rose and Dusky Orbs A Shield Push myth?
Its uncertain what the origins of this myth are. Some scholars purport that it describes the origins of Shield Push but most devotees of the game dispute that. You can perform a Heroquest based on this but it does require a regulation Shield Push team to do so. Its extremely dangerous for some reason, and has a Resonance of 150%.Dawn and Dusk did feud. At first naught but haughty looks flew back and forth but soon they switched to words and baleful glances and finally with intent of mayhem each hurled their beloved orb at the other. Being full of grace though each caught the others orb and so avoided lasting harm. But each looked down at what they held with disgust. What is this thing I hold? This orb displeases me. I wish I had my own to hold once more." Each glared at the other. Return my orb to me!" each shouted and implored but neither would risk the other ending up with both.
Dawn turned to her ten golden suitors and Dusk to her ten violet ones: Fetch me my orb my sister has stolen". They turned to do her bidding but were called back at once. But take care to shed no blood lest Yelm burn us with His displeasure." The suitors nodded and arming themselves with shields they went to wage bloodless war. The two lines of suitors strained and pushed at each other trying to force the other back. It was a titanic battle but eventually one of the line of suitors managed to force the other back so they could take the orb back to its rightful owner.
The Game
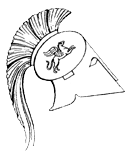
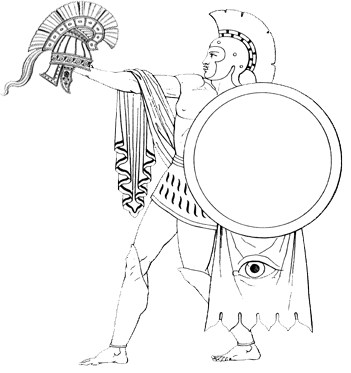
Shield Push is an ancient game that originated in Dara Happa. The game has since spread wherever the Lunar Empire has extended their reach. It is played on a large field with a post at each end. On top of each post is a Templars Helmet with a distinctive colored crest Gold for the Dawn helmet, Violet for the Dusk helmet. The field is traditionally 24 x 40 meters (roughly representing the lozenge shape of Glorantha) but can be of any size. Every two meters along the length of the field is a line called a Step. Wherever possible the field is oriented on a strict East-West basis. The eastern end of the field is known as the Dawn line while the western end is known as the Twilight line. (For simplicitys sake both of these lines are referred to as End Lines). In the centre is another line known as the Noon Line. Each team guards the opposing teams helmet.There are two ways to win the game. The first and most exciting way is to grab your teams helmet from under the other teams noses and run it back over your own end line. The oldest form of the game involved two teams of 10 (a sacred number in Dara Happa) striving to push the other team back over their own end line. This allowed one of them to grab their helmet and run it back across their own end line. (More recently, in order to save time the game has been ended as soon as one team forces the other off the field, but this innovation has been decried by traditionalists).
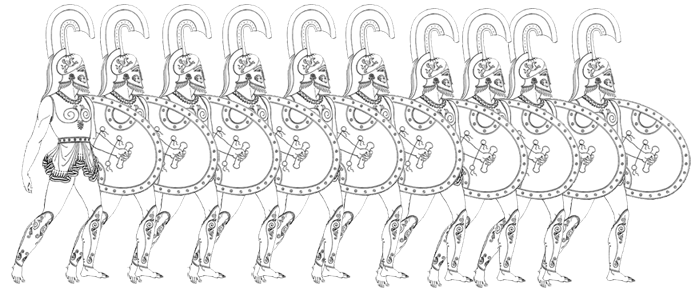
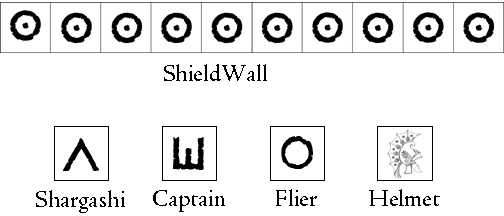
The next addition was a player known as the Flier. This players goal is to get over, through or around the opposing line and make a dash for his teams helmet. The Flier is usually a small but fleet individual. The last addition to the team was two players known as Shargashi. Big, burly brutes, their job is to protect the Flier, push through the opposing shield line, or stop the opposing Flier. Technically no one is supposed to be intentionally injured in shield push, but accidents do happen. Every team member except the Captain and the Flier are armed with a large flat shield, traditionally modeled on a hoplite shield but often only the size of a target shield. The two Shargashi are often equipped with two heater-sized shields instead. The two teams line up 4 meters from the Noon line and at a signal charge each other.
The Basics
The game consists of a series of turns. It lasts until one team or the other wins. Each team is made up of five components: 1) The Shieldwall, which acts as a single component; 2 & 3) The two Shargashi which can operate independently; 4) The Flier; 5) The Captain. Each turn the separate components of the team are allowed one action each. Both teams move at the same time, and the person controlling the team plans out the turns actions using cards. Included in the game is a mat to print out that allows you to control each team component. Before the game starts, and at the beginning of each turn, the team controller must decide what action each of the team components is going to attempt. Once a card is played determining the components actions their actions are limited.
Game Set-up
Before the game starts sides are chosen, using a golden wheel for the coin toss. Its considered lucky to be playing on the half of the field that corresponds to Yelms actual position in the Sky Dome which isnt surprising, as your opponent will be playing with Yelms glory in his eyes. If the time of day hasnt been predetermined by the GM, roll a D10 to see where Yelm is in the heavens:
| 1D10 | Yelms Position |
|---|---|
| 1-4 | Climbing into the heavens over the East Side of the field. Captain on West side must test his Pact with Yelm |
| 5-6 | Directly Overhead; both Captains must test their Pact with Yelm |
| 7-10 | Descending towards the Gates of Dusk over the West Side of the field. Captain on East side must test his Pact with Yelm |
The Captain of the team on the side looking at Yelms brilliance must make a test versus his Pact with Yelm to see whether his team is disadvantaged. (On a roll of 5 or 6 both Captains test). If he has no Pact with Yelm he can test versus half his best Solar Pantheon Pact. If he is from some heathen cult his team has only a 5% of not being disadvantaged. This disadvantage takes the form of a 10% penalty to all skills used in Shield Push. This disadvantage also affects the Captains bonus.
Rules
 Only Captains and Fliers are allowed to touch the helmet. Fliers are not allowed to touch other players. Shieldmen are only allowed to push and are not allowed to touch any of the players other than other Shieldmen. Shargashi are allowed to touch any of the players but cannot touch the helmets.
Mechanics
The game is divided into turns. Each turn every player can make one action. To simplify the game, assume that no one can move farther than 4 Steps in a turn without an Athletics roll. On a successful Athletics roll, they can move 8 Steps.Skills are either unopposed or opposed rolls. In unopposed rolls, rolling under the team members skill on percentage dice allows that player to succeed. Opposed rolls work slightly differently than they do in the RQ rules; if both contestants in an opposed contest roll the same success there is a Stalemate, (neither side succeeds and nothing happens). The applicable skills used depend on the position played.
How It All Works
You need some markers or figures. 14 a side with 10 Shieldmen, 2 Shargashi, 1 Flier and the Captain. The field of play should be 24 X 40 meters. For 25 mm figures this corresponds well enough to 12 x 20 inches. You can use a battlemap marked with hexes. Each hex is considered to be 2 meters or 6 feet. Dark lines should be marked for the Dawn, Noon and Dusk Lines with lighter lines every inch or hex in between to mark the step lines. In the middle of each end zone should be a dot representing the post holding the helmet.A field to print out is included in the Shieldpush Game Pack.
1) Roll a D10 to determine Yelms position.
2) Flip a coin to see whose team gets which side.
3) Set up the two Shieldwalls three Steps away from the Noon Line. They may not set up closer than 1 inch/hex to either side of the field. The other team members are placed at least two Steps back. The Shargashi are placed three inches/hexes away from the side line with four inches/hexes between them. The Captain and Flier can be placed anywhere behind them.
4) While the Fliers are still on their own side of the Shieldwall, both Captains must use the attached action cards to indicate their strategy for the Captain, Flier & the Shargashi. All four players can be sent to different parts of the field. Once any team members are in front of their own Shieldwall, cards no longer need to be played.
There are five areas the Flier and the Shargashi can attempt: Outside Left, Left, Centre, Right, and Outside Right. Outside Left and Right are the hexes between the Shieldwall and the side of the field. Left and Right are the three hexes next to the Outside ones and Centre is the four hexes in the middle of the field.
5) The contest begins at the sound of the sacred horn. The Shieldwalls rush at each other and start pushing while the Flier and the Shargashi move to their assigned areas. The team controllers roll percentage dice for their Shieldwalls Push ability. Compare levels of success as you would in RQ.
For each level of success attained, the opposing Shieldwall is pushed back one Step. If the winning side rolled a critical, the losing side has to test their Athletics skill (unopposed). If they roll a failure or fumble they fall down as well as being pushed back.
 6) The Flier, meanwhile, is going around or over the Shieldwalls. To go around just requires standard movement. They will have to avoid the enemy Shargashi. To go over they can do either of the following:
- Use their Athletics (or Acrobatics) skill to climb over their own and the enemy Shieldwalls and then jump to the ground. This takes one turn.
- Be hurled over the wall by their Shargashi. This requires a Brawn roll by the Shargashi. Combine their STR and subtract the Fliers SIZ. For every point remaining the Shargashi can hurl the Flier one-quarter Step (1/2 meter). This takes one turn and requires an Athletics roll by the Flier to land on their feet and avoid a face plant. The Shargashi cannot react to the enemy Flier the turn this happens.
On the turn the team is attempting this action the Captain plays the Were Going Through" card and an applicable Zone card (Left, Centre or Right) to show where the Shargashi are going to attempt their breakthrough.
If both teams try this tactic during the same turn and choose the same Zone, there is a chance that the Shargashi will get to bonk heads together, allowing the Fliers free rein.
7) Once around or through the enemy Shieldwall, the Flier has to run to the end zone to retrieve their helmet and run back close enough to the Shieldwalls to hurl the helmet over the Shieldwalls to their Captain. Retrieving the helmet is a Simple test (+20) versus Athletics. The helmet can be hurled one hex (2 meters) for each point of STR the Flier has. The Captain has to make a simple test (+20) versus Athletics as well to catch the Helmet. Once he has possession of the Helmet he just needs to race it to his own End Line for his team to win. If the helmet passes within 2 hexes of an opposing Shargashi, they may attempt to block the throw using their shields. They need to beat the fliers Athletics roll with their own Athletics. If the helmet is intercepted in this manner, the game is stopped temporarily while the helmet is returned to its post and everyone but the Shieldwalls have to return to their own side of the field.
Applicable Skills
Captain
The skills the Captain uses in the game are:
- Tactics or Influence: He can add his critical range in either of these skills to all other skill tests his team makes. For example: Captain Starcrossed has an 86% Tactics skill. Therefore he adds a 9% bonus to his teams rolls. (Note that this may be modified if he failed his roll versus Yelms Brilliance. In such a case his Tactics skill goes down to 76% and the bonus drops to 8%).
- Athletics: This is the skill used to grab the Helmet thrown to him by the Flier. If he runs to his own End Line unopposed, he doesnt need any rolls.
- Evade: This is the skill used to avoid getting pummeled by the Shargashi. If a Captain is running and a Shargashi comes at him to block or knock him down, he can attempt an opposed Evade versus the Shargashis Bash attack to avoid getting knocked down or blocked. Unlike regular combat, the Captain can evade every turn. Roll dice and compare the results on the Evade Shargashi Table.
Flier
- Athletics: This is the skill Fliers use to clamber over the Shieldwalls, and the skill they use to land on their feet if theyre thrown by the Shargashi. Its also the skill they use to grab the helmet and to throw it over the Shieldwalls. Acrobatics may be used instead, if the Flier has that skill and its higher than his Athletics.
Athletics is also used to temporarily run faster. On a successful roll the Flier can move 8 hexes instead of the usual 4.
- Evade: Same as the Captain
Shargashi
- Athletics: Used if the Shargashi wants to run faster than normal to intercept a Flier or Captain. On a successful test normal movement of 4 hexes is doubled. Also used if the helmet thrown by a Flier passes within 2 hexes of a Shargashi. If they can make a successful Athletics roll versus the Athletics roll made by the Flier, they can knock the Helmet out of the air. Once the helmet is out of the air, the Captain can retrieve it and return it to the End Post.
- Bash: Based on their best shield-based combat skill; this is the simple act of trying to knock a Flier or Captain from his feet, or at least stop them. Make opposed rolls for the affected players and compare the results with the Evade Shargashi Table.
Levels of Success Table
| Team 1 | Team 2 | |||
|---|---|---|---|---|
| Critical | Success | Failure | Fumble | |
| Critical | Stalemate | 1 Level (Team 1) | 2 Levels (Team 1) | 3 Levels (Team 1) |
| Success | 1 Level (Team 2) | Stalemate | 1 Levels (Team 1) | 2 Levels (Team 1) |
| Failure | 2 Levels (Team 2) | 1 Level (Team 2) | Stalemate | Stalemate |
| Fumble | 3 Levels (Team 2) | 2 Levels (Team 2) | Stalemate | Stalemate |
Evade Shargashi Table
| Shargashi | Captain/Flier | |||
|---|---|---|---|---|
| Critical | Success | Failure | Fumble | |
| Critical | Stalemate | Captain/Flier Stopped | Captain/Flier forced back one Step | Captain/Flier knocked down. Falls prone and must stand up on his next turn |
| Success | Captain/Flier gets past | Stalemate | Captain/Flier Stopped | Captain/Flier forced back one Step |
| Failure | Captain/Flier gets past and doubles movement | Captain/Flier gets past | Stalemate | Captain/Flier stopped |
| Fumble | Captain/Flier gets past and doubles movement. Shargashi must roll on fumble table | Captain/Flier gets past and doubles movement | Captain/Flier gets past | Stalemate |
Shargashi Fumble Table
| 1D10 | Effect and result |
|---|---|
| 1-2 | Falter May not act next turn. |
| 3-4 | Drop shield. Shield falls D2 hexes away. -10 Bash skill if not retrieved. Retrieval takes an entire turn. |
| 5-6 | Fall. Lose next turn standing up. |
| 7-8 | Bash friend. If someone is close enough you bash them. Roll normal bash attack against them. They automatically fail their test. If no one is close enough, bash yourself. |
| 9-10 | Unlucky. Roll twice. |
To Assemble the Game
The complete game (Rules, Counters and Field) are available in the Shieldpush Game Pack. Print off all pages and cut out all the counters. Note that the Shiedwall is cut out as one long strip, not 10 separate pieces.